Views: 3366 Author: Site Editor Publish Time: 2021-08-31 Origin: Site


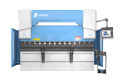
The DA-41 is a programmable control for conventional press brake machines. This manual assumes that the DA-41 is configured using the bending depth formula. If the unit is configured for bending depth calculation based on tables please refer to the version 2 user manual (8064-901C). If you are not sure which method is configured please contact your machine supplier.
⒈Front panel
The following picture shows a representation of the front panel. The panel contains one display and several keys for programming and axis control. The display will be explained in the next section.

The keyboard contains the following keys:
● 10 numerical keys (0 - 9)
● decimal point
● plus/minus toggle
● clear key, to clear a parameter value
● enter key, to enter a typed value
● arrow keys, to select various parameters
● stop key (0) (incl. status LED)
● start key (1) (incl. status LED)on.
⒉Display
The DA-41 has a monochrome LCD display, 320 x 240.

At the top of the screen, the different operation modes are represented by symbols.
⒈Introduction
The DA-41 has a monochrome LCD display, 320 x 240.

It is indicated in the top of the screen which mode is active
⒉Basic navigation
● To switch between modes, press the <arrow up> key until the mode symbol is highlighted. Then use the <arrow left> and <arrow right> key to move to the required mode.
● To enter a mode press the arrow key down.
● Within a mode, use the arrow keys to move around between parameters and fields.
● To program a parameter, move the cursor to the appropriate symbol and type the required value. Press ENTER to conproduct firm the value. A programmed value is also confirmed when an arrow key is pressed. In some cases, the <arrow left/right> keys can also be used to change values.
● Steps and their parameters can only be programmed and viewed when the control is stopped.
⒊Product programm

This programming screen in divided into three areas. From top to bottom these are:
● Current Y and X position
● General product properties
● Table with bend steps, each step has several parameters In the upper right corner of the screen, the number of the currently active program is shown. In this screen, a product program can be edited and executed. Programming of products will be explained in chapter 4.
⒋Tool Selection

This screen displays an overview of the available tools. The table indicates the tool number, the V-opening, the tool angle and radius. During product programming, the programmed tool properties are used for the calculation of Y-axis values. To enter the tool properties place the cursor on the applicable field of a tool and simply enter the desired value.
⒌Program constantsing

In this screen, several control settings can be viewed and changed. Parameters (except the read-only ones) can be edited using the arrow keys (left and right) or they can be programmed numerically. The program constants menu can be exit by navigating to the upper symbol menu with the arrow up key or by pressing the STOP button to return directly to the automatic production mode.
Service menu: To access the service menu type the code 456 followed by the enter key.To exit the service menu press the STOP button Note: when enter the enter key is pressed without the specified code the calibration point will be displayed but cannot be changed (read only). This will be indicated with a lock symbol in the upper right corner of the screen.

In the service screen the actual calibration point can be programmed and an overview of actual system information is available.


Depending on the machine specifications one or more of the below mentioned functions can be available on the program constants screen.


In this screen the X- and Y-axis can be moved manually with the arrow keys. This can only be done when the control is not started. By using the arrow keys up and down the Y or X-axis can be selected. To move an axis gradually, press the left or right arrow key once. To move an axis at high speed, press the arrow key continuously.
⒍Product select


There are 100 product programs available in the control.
To edit a program, it must be selected first. By default, all programs consistof 0 steps. As soon as a program has been selected, one step is added to the program.
To select a program, move the cursor to the required program number and press ENTER to select it. This program number is also displayed in the upper right corner of the screen, beside the mode symbol.
To select a program with a high number (e.g. 74), press the first digit of this number (e.g. 7). The cursor will automatically jump to the group of numbers that begin with this digit. Then use the arrow keys to get to the correct program number.
When a program has been selected, the control automatically switches to the programming mode.
A program remains active until another program is selected or until it is deleted.
To delete a program, move the cursor to the program number and press the clear key. The program number remains, but the number of steps is reset to 0.
⒎Key lock
The control is equipped with a key lock function, to prevent unauthorised programming. Whether the key lock function is available or not depends on the machine specifications.
If the control is unlocked, it can be programmed as described in this manual.
If the control is locked, it is indicated by a lock symbol in the upper left corner of the programming window.

When locked, the following operational restrictions apply:
● programs cannot be created or edited
● programs cannot be deleted
● tools cannot be created or edited
The following actions are still possible when the control is locked:
● programs can be selected (if they consist of one or more steps)
● programs can be executed
● Y-axis corrections within programs can be changed
● program constants can be changed
● axes can be moved through the manual movement screenion
If you want to download the DELEM DA-41S operation manual in PDF, You can go to visit our download center, here you will find all the manuals you will need.

 English
 Pусский